Table Of Contents
Introduction
Crochet is not only a versatile craft but also a beautiful way to express creativity, and making a heart granny square is a perfect project to showcase your skills. Whether you’re a beginner or an experienced crocheter, this pattern will guide you through creating your own heart granny square, combining elegance and charm. Let’s explore how to crochet this lovely design step by step!

♥️♥️♥️♥️♥️♥️♥️♥️♥️♥️♥️♥️♥️♥️♥️
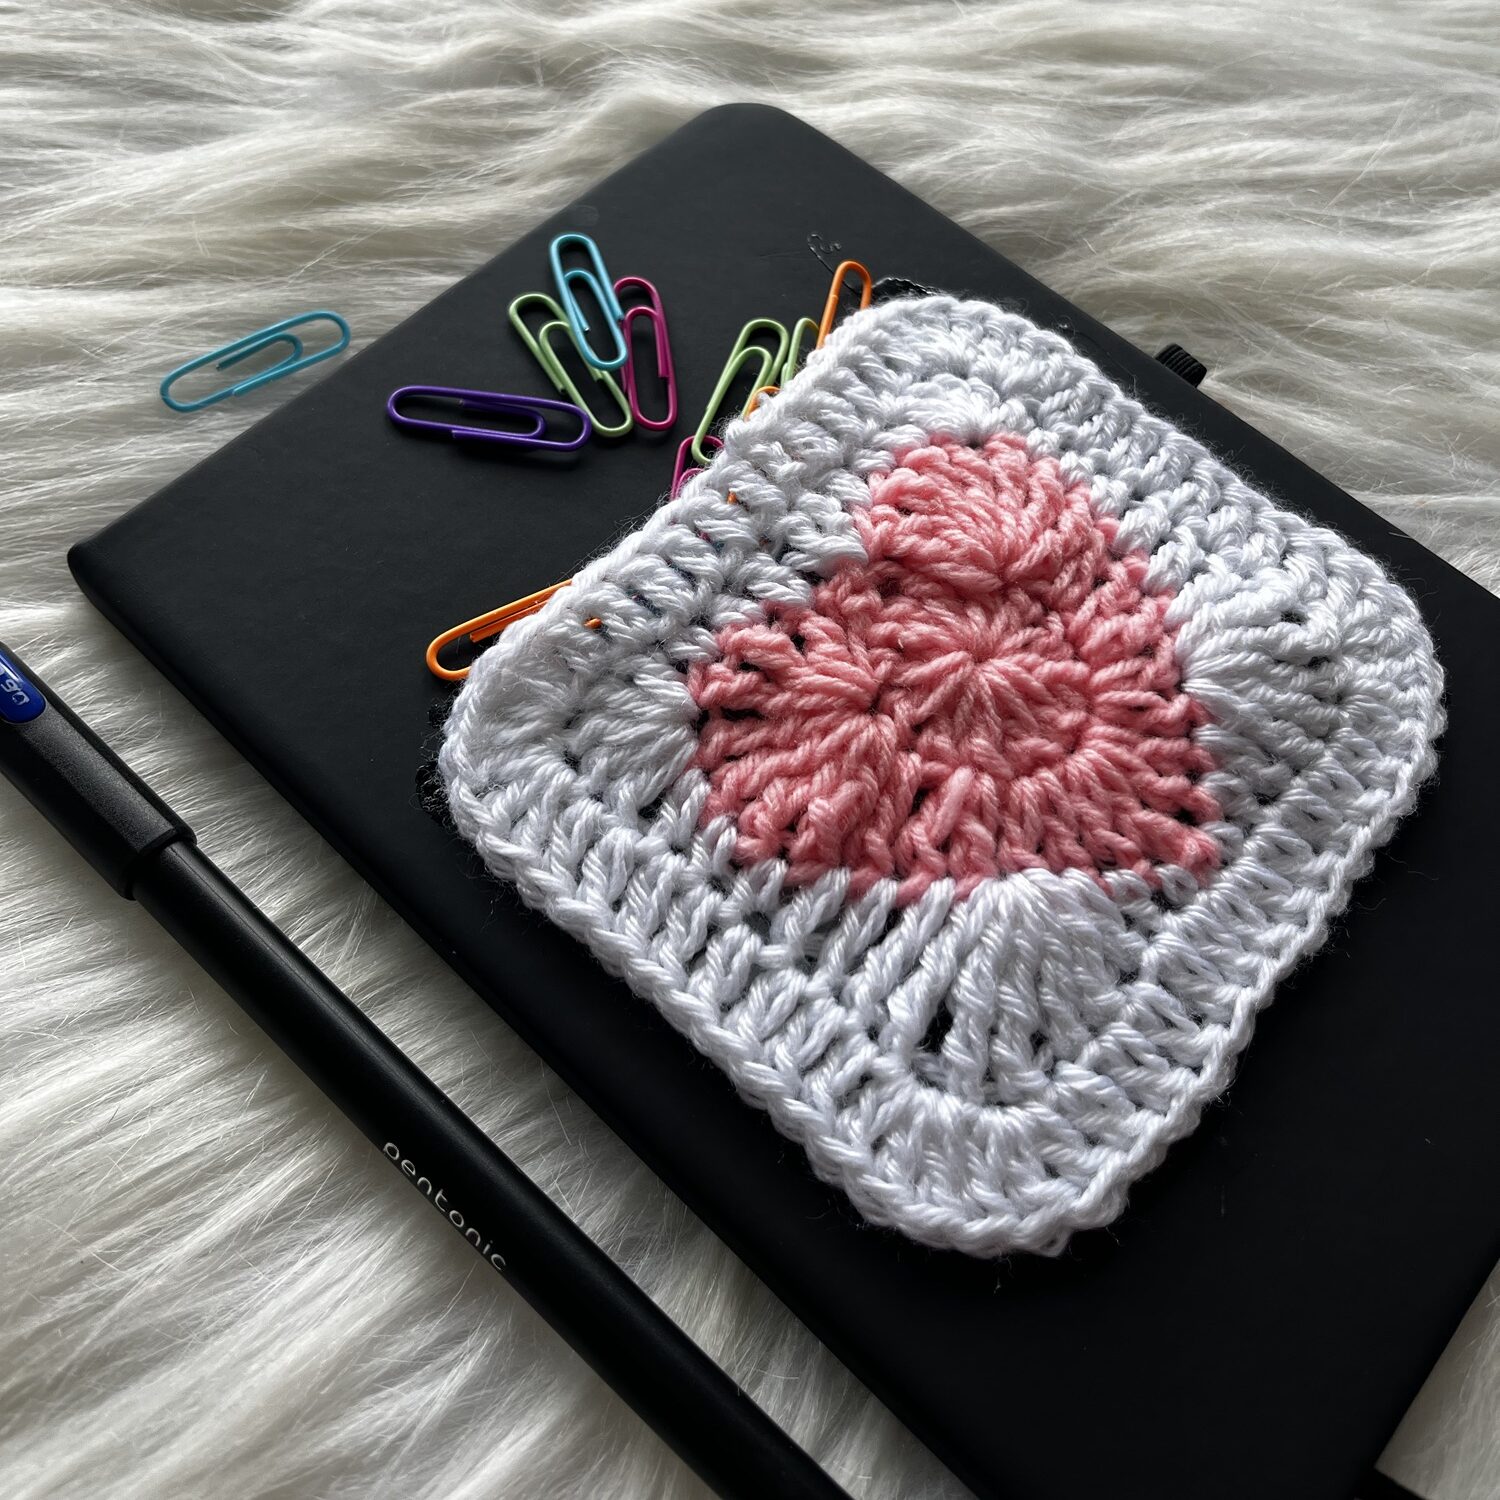
Isn’t this beautiful? You can use this granny square pattern to create a variety of crafts, such as scarves, tote bags, purses, blankets, and more! I’ve attached mine to the cover of my journal by securing three sides and leaving the top open, turning it into a functional pocket. It’s an easy way to give your journal a complete makeover!
I have given the written direction for this very cute and easy Crochet Heart Granny Squarer in this blog. However you can also visit my YouTube channel link to understand the stitching technique better.

This project requires a bit more focus, making it more suitable for those with some crochet experience. With its detailed stitch patterns, it demands careful attention to each step, offering a great opportunity for practicing concentration and precision.
For the step-by-step video tutorial-
Please subscribe to my channel for all the latest and the best patterns.
Since, Most of the crochet lovers just loved this pattern….. I think, you will also love it……
Therefore, just leave a comment in the comment section about it.
For getting updates of all my free patterns, please fill in the subscribe form

DECLARATION
Hi, I am Shabari Dutta. I work very hard on each and every pattern provided in this website, So you can always give a credit by mentioning my name & website www.hookedinloopsbyshabari.com in your posts.....♥️♥️♥️♥️♥️♥️♥️♥️♥️♥️♥️♥️♥️♥️♥️, h
You can sell any product made from this patternowever, you may not distribute this pattern as your own in any way!
Materials Needed:
Before we begin, gather the following materials to make your heart granny square:
- Yarn: Two colors of your choice (one for the heart, one for the background). I have 4 ply acrylic yarn.
- Crochet hook: Size recommended for the yarn (usually 2.5mm-3.5mm)
- Scissors
- Yarn needle: For weaving in the ends
- Stitch marker: Optional, to mark your rounds
With these materials in hand, you’re all set to start crafting your heart granny square.
Written Pattern For The Crochet Heart Granny Square

Round 1:
- Using pink yarn for the center heart of the granny square, start by creating a magic ring.
- Chain 2 (do not count this as a stitch), then work 12 double crochets into the magic ring.
- Close the ring by pulling the tail, and finish the round with a slip stitch to the first double crochet.
Round 2:
- Skip the first stitch (where you made the slip stitch) and in the second stitch, work 7 triple crochets.
- In the next stitch, work 1 double crochet.
- In the next three stitches, work 2 double crochets into each stitch.
- Chain 1, then work a slip stitch into the base of the chain (this forms a chain-1 picot).
- In the same stitch, work 2 more double crochets.
- In the next two stitches, work 2 double crochets into each.
- In the next stitch, work 1 double crochet.
- In the following stitch, work 7 triple crochets.
- Skip the next stitch and slip stitch into the one after.
- Finally slip stitch into the first triple crochet of the round, chain 1, and cut the yarn, leaving a small tail. Use a yarn needle to fasten it off.
Round 3:
- Join the white yarn with a slip knot, then slip stitch into the second-to-last slip stitch from Round 2 (marked in red).
- Chain 2 (do not count this as a stitch), then work 1 double crochet into the same stitch.
- In the next stitch, work 1 double crochet, followed by 1 half double crochet in the next stitch.
- Work 1 single crochet into the next stitch, then 5 double crochets into the following stitch.
- Work 1 half double crochet into each of the next 3 stitches, followed by 1 double crochet into each of the next 2 stitches.
- Then in the next stitch, work 1 triple crochet.
- In the following stitch, work 3 double triple stitches and 2 triple stitches.
- Continue by working 1 double crochet in the next stitch, 1 half double crochet in the next, and 1 single crochet in the following stitch.
- Slip stitch into the front loop of the next stitch, followed by 1 single crochet, 1 half double crochet, and 1 double crochet into the next three stitches.
- Then in the next stitch, work 2 triple stitches and 3 double triple stitches.
- Then, work 1 triple crochet in the following stitch, 1 double crochet into each of the next 2 stitches, and 1 half double crochet into each of the next 3 stitches.
- Work 5 double crochets in the next stitch, followed by 1 single crochet in the next stitch, and 1 half double crochet in the next.
- Work 1 double crochet into the following stitch, then slip stitch into the first double crochet of the round.
Round 4:
- Chain 2 (do not count this as a stitch) and work 1 double crochet into the same stitch.
- In the next 5 stitches, work 1 double crochet into each.
- Then in the next two stitches, work 3 double crochets into each.
- Work 1 double crochet into each of the next 8 stitches, then 3 double crochets into each of the next 2 stitches.
- Continue with 1 double crochet into each of the next 11 stitches.
- Then work 3 double crochets into each of the next 2 stitches, followed by 1 double crochet into each of the next 8 stitches.
- Once again, work 3 double crochets into each of the next 2 stitches.
- Work 1 double crochet into each of the next 5 stitches.
- Slip stitch into the first double crochet of the round, then ch1 and cut the yarn, and fasten off using the yarn needle.
The Granny Heart Pattern is now ready!!!

Tips and Suggestions:
Now that you’re working on your heart granny square, there are several key tips and suggestions to keep in mind. First and foremost, always ensure you’re counting your stitches. Skipping or adding stitches can easily alter the shape of the square, so being mindful of this is essential. Moreover, don’t hesitate to play around with colors. Switching up the colors of the heart and background yarn can create a completely different look, making each square unique.
Additionally, if you’re new to the magic ring technique, you might want to practice it a few times before starting. It can feel tricky at first, but once mastered, it’s a fantastic way to create a neat and tidy center for your square. Another suggestion is to block your finished squares, especially if you plan to join several together for a blanket or larger project. This will help ensure all squares are uniform in size and shape.
Also, remember to weave in your ends carefully. Since you’re working with two different colors, weaving in your yarn tails securely will prevent them from coming loose over time.
Conclusion:
To sum up, crocheting a heart granny square is a beautiful and rewarding project that allows you to add a personal touch to any project. Whether you’re making one square for a coaster or several to create a blanket, the heart design adds a touch of love and elegance. Moreover, by following the tips and suggestions shared above, you can ensure that your squares turn out perfect every time. So, grab your yarn and hook, and start crocheting a heart granny square today!
Happy crocheting!


| Subscribe … on Youtube | Follow … on Pinterest | Follow … on Instagram | |


Unique idea my love 😘
Thank you so much my jaanu