Table Of Contents
Introduction
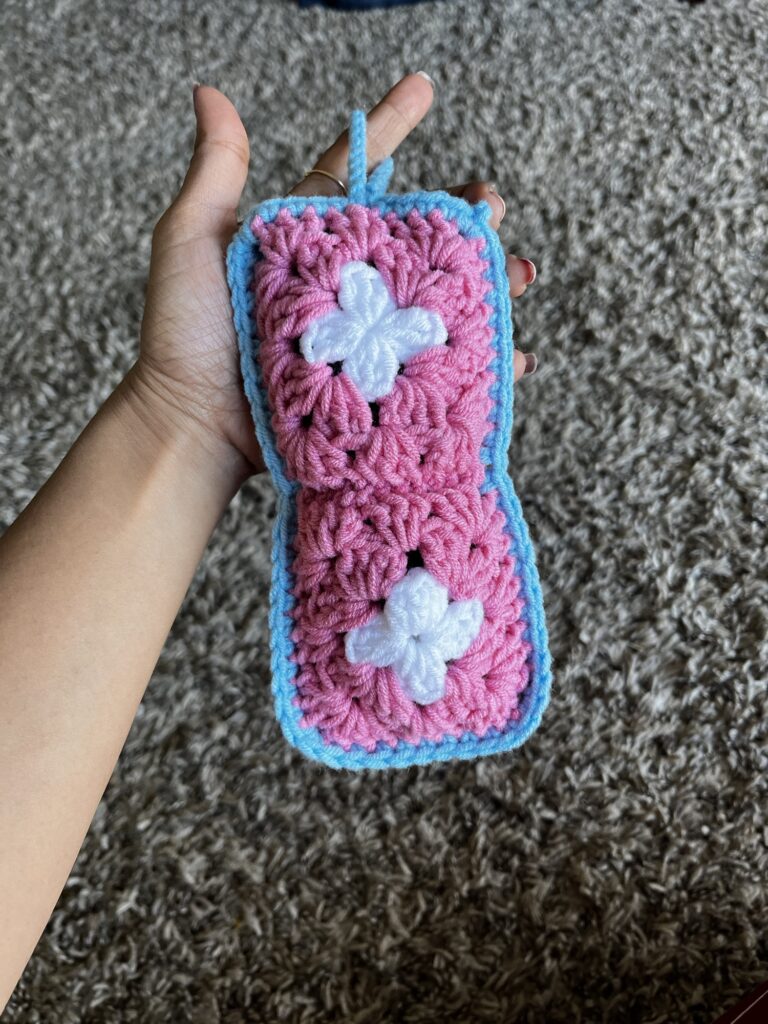
Crochet enthusiasts will find that crafting a granny square sunglass holder is both a rewarding and enjoyable project. Not only does it provide a chance to practice and perfect your crochet skills, but it also results in a functional and fashionable accessory. In this guide, we’ll take you step-by-step through the process, thus ensuring that each phase is clear and easy to follow. Let’s dive in and create something beautiful!

♥️♥️♥️♥️♥️♥️♥️♥️♥️♥️♥️♥️♥️♥️♥️
Isn’t this beautiful? You can make this sunglass holder in less than an hour. You can gift these to your dear ones. … Handmade gifts are just perfect !!!!
I have given the written direction for this very cute and easy Crochet Granny Square Sunglass Holder in this blog. However you can also visit my YouTube channel link to understand the stitching technique better.

This project is really fast and easy and hence a perfect practice project for beginners.
For the step-by-step video tutorial-
Please subscribe to my channel for all the latest and the best patterns.
Since, Most of the crochet lovers just loved this pattern….. I think, you will also love it……
Therefore, just leave a comment in the comment section about it.
For getting updates of all my free patterns, please fill in the subscribe form

DECLARATION
Hi, I am Shabari Dutta. I work very hard on each and every pattern provided in this website, So you can always give a credit by mentioning my name & website www.hookedinloopsbyshabari.com in your posts.....♥️♥️♥️♥️♥️♥️♥️♥️♥️♥️♥️♥️♥️♥️♥️, h
You can sell any product made from this patternowever, you may not distribute this pattern as your own in any way!
Materials Needed
Before we start, gather the following materials:
- Yarn in white, pink, and blue. However I have used 100 % acrylic yarn-3 DK light worsted
- A crochet hook suitable for your yarn. Accordingly, I have used 3 mm hook.
- Scissors
- A yarn needle for weaving in ends
Crochet Granny Square Pattern
Instructions:

- White Round:
- Begin with a magic ring (mr). Chain 2 (ch2); this does not count as a stitch. Work 3 double crochets (dc) into the magic ring, then chain 2 (ch2). Then repeat this sequence (3 dc, ch2) 3 more times, making a total of 4 sets. Slip stitch (sl st) into the top of the first double crochet of the round. Finally, chain 1 (ch1), cut the yarn, and secure it.
- Pink Round 1:
- Attach pink yarn to any chain-2 space (ch2 sp) from the previous round with a slip stitch (sl st). Then chain 2 (ch2); this does not count as a stitch. In the same chain-2 space, work 3 double crochets (dc), then chain 2 (ch2), and 3 double crochets (dc). Move to the next chain-2 space and then repeat the sequence: 3 dc, chain 2 (ch2), 3 dc. Continue this pattern in the remaining two chain-2 spaces. At the end of the round, slip stitch (sl st) into the top of the first double crochet of the first set, the second double crochet, the third double crochet, and then into the first chain-2 space of this round.
- Pink Round 2:
- Chain 2 (ch2); this does not count as a stitch. In the same chain-2 space, work 3 double crochets (dc), chain 2 (ch2), and then 3 double crochets (dc). In the space between two sets of corner stitches, work 3 double crochets (dc). Move to the second chain-2 space and work 3 dc, then chain 2 (ch2), and 3 dc. In the space between the next two sets of corner stitches, work 3 dc. Repeat this pattern until the end of the round. Slip stitch (sl st) into the top of the first double crochet stitch, chain 1 (ch1), and finally cut the yarn.
- Finishing:
- Make a total of 4 such granny squares using the above pattern.
Joining Two Crochet Granny Squares
- Preparation:
- Place the front sides of both granny squares facing each other.
- Joining:
- Slip stitch (sl st) the pink yarn into the opposite chain-2 space (ch2 sp) of both squares. Then proceed to slip stitch in each corresponding stitch of the two squares, working through the second loop of the stitch in Square 1 and the first loop of the stitch in Square 2, as they are aligned with each other.
- Completion:
- When you reach the next chain-2 spaces (ch2 sp) of both squares, chain 1 (ch1) and cut the yarn. Join the remaining two squares in the same manner. Finally, you will end up with two rectangular pieces.
Assembling the Sunglass Cover
- Preparation:
- Place the back sides of both rectangular pieces facing each other.
- Joining:
- Slip stitch (sl st) with blue yarn into the top chain-2 space (ch2 sp) of both pieces. Chain 1 (ch1). Then work 1 single crochet (sc) in the same chain-2 space of both top squares. Join the pieces by working 1 sc in each corresponding stitch along the top squares. Work 1 sc in the joining chain-2 space of the top squares, then 1 sc in the joining chain-2 space of the bottom squares. Continue by working 1 sc in each corresponding stitch along the bottom squares.
- Closing the Bottom:
- When you reach the bottom chain-2 space, work 2 sc in that space. Join the opposite stitches with sc until you reach the other bottom chain-2 space, where you will again work 2 sc. This closes one side and the bottom.
- Closing the Third Side:
- Work 1 sc in each corresponding stitch along the bottom squares. Then, work 1 sc in the joining chain-2 space of the bottom squares, followed by 1 sc in the joining chain-2 space of the top squares. Join the pieces with 1 sc in each corresponding stitch along the top squares. Then work 1 sc in the top chain-2 spaces of both top squares. This completes closing the three sides.
- Creating the Top Border:
- Start by working 1 sc in the same chain-2 space of the front square. In the next four stitches of the front square, work 1 sc in each. Chain 3 (ch3), skip the next stitch, then work 1 sc in each of the following four stitches. Work 1 sc in the chain-2 space of the front square, followed by 1 sc in the adjacent chain-2 space of the back square. Then work 1 sc in each of the next 5 stitches. Chain 20 (ch20), slip stitch (sl st) into the same chain. Then work 1 sc in each of the following 4 stitches and 1 sc in the next chain-2 space. Finally, slip stitch (sl st) into the first sc of this border round, chain 1 (ch1), cut the yarn, and weave in the loose ends. You can pass the ch20 loop through the opposite ch3 space to lock the sunglass holder in place. Hence this step ensures that the holder stays closed.
Your sunglass cover is now complete!
Tips and Suggestions to make the Crochet Case
To ensure a smooth crochet experience, consider the following tips:
- Increase the Rounds: You can increase the number of rounds in your granny squares to create larger squares. This adjustment thus allows you to customize the size of your sunglass holder to better suit your needs.
- Play with Colors: Experiment with different color combinations to make your sunglass holder unique. You can alternate colors for each round or also use variegated yarn for an eye-catching effect.
- Use a Stitch Marker: Place a stitch marker in the first stitch of each round to keep track of your rounds.
- Check Tension: Maintain even tension to ensure that all your squares and joins are uniform.
- Practice Joining: If you are new to joining squares, practice on scrap yarn first to get comfortable with the technique.

Conclusion
In conclusion, creating a granny square sunglass holder is a delightful project that allows you to showcase your crochet skills while producing a practical item. By following the detailed steps provided and applying the tips offered, you can craft a stylish and functional accessory. Enjoy your crocheting journey, and don’t hesitate to share your finished project with fellow enthusiasts!


Happy crocheting!
| Subscribe … on Youtube | Follow … on Pinterest | Follow … on Instagram | |


