Table Of Contents
Introduction To This Wonderful Crochet Blog
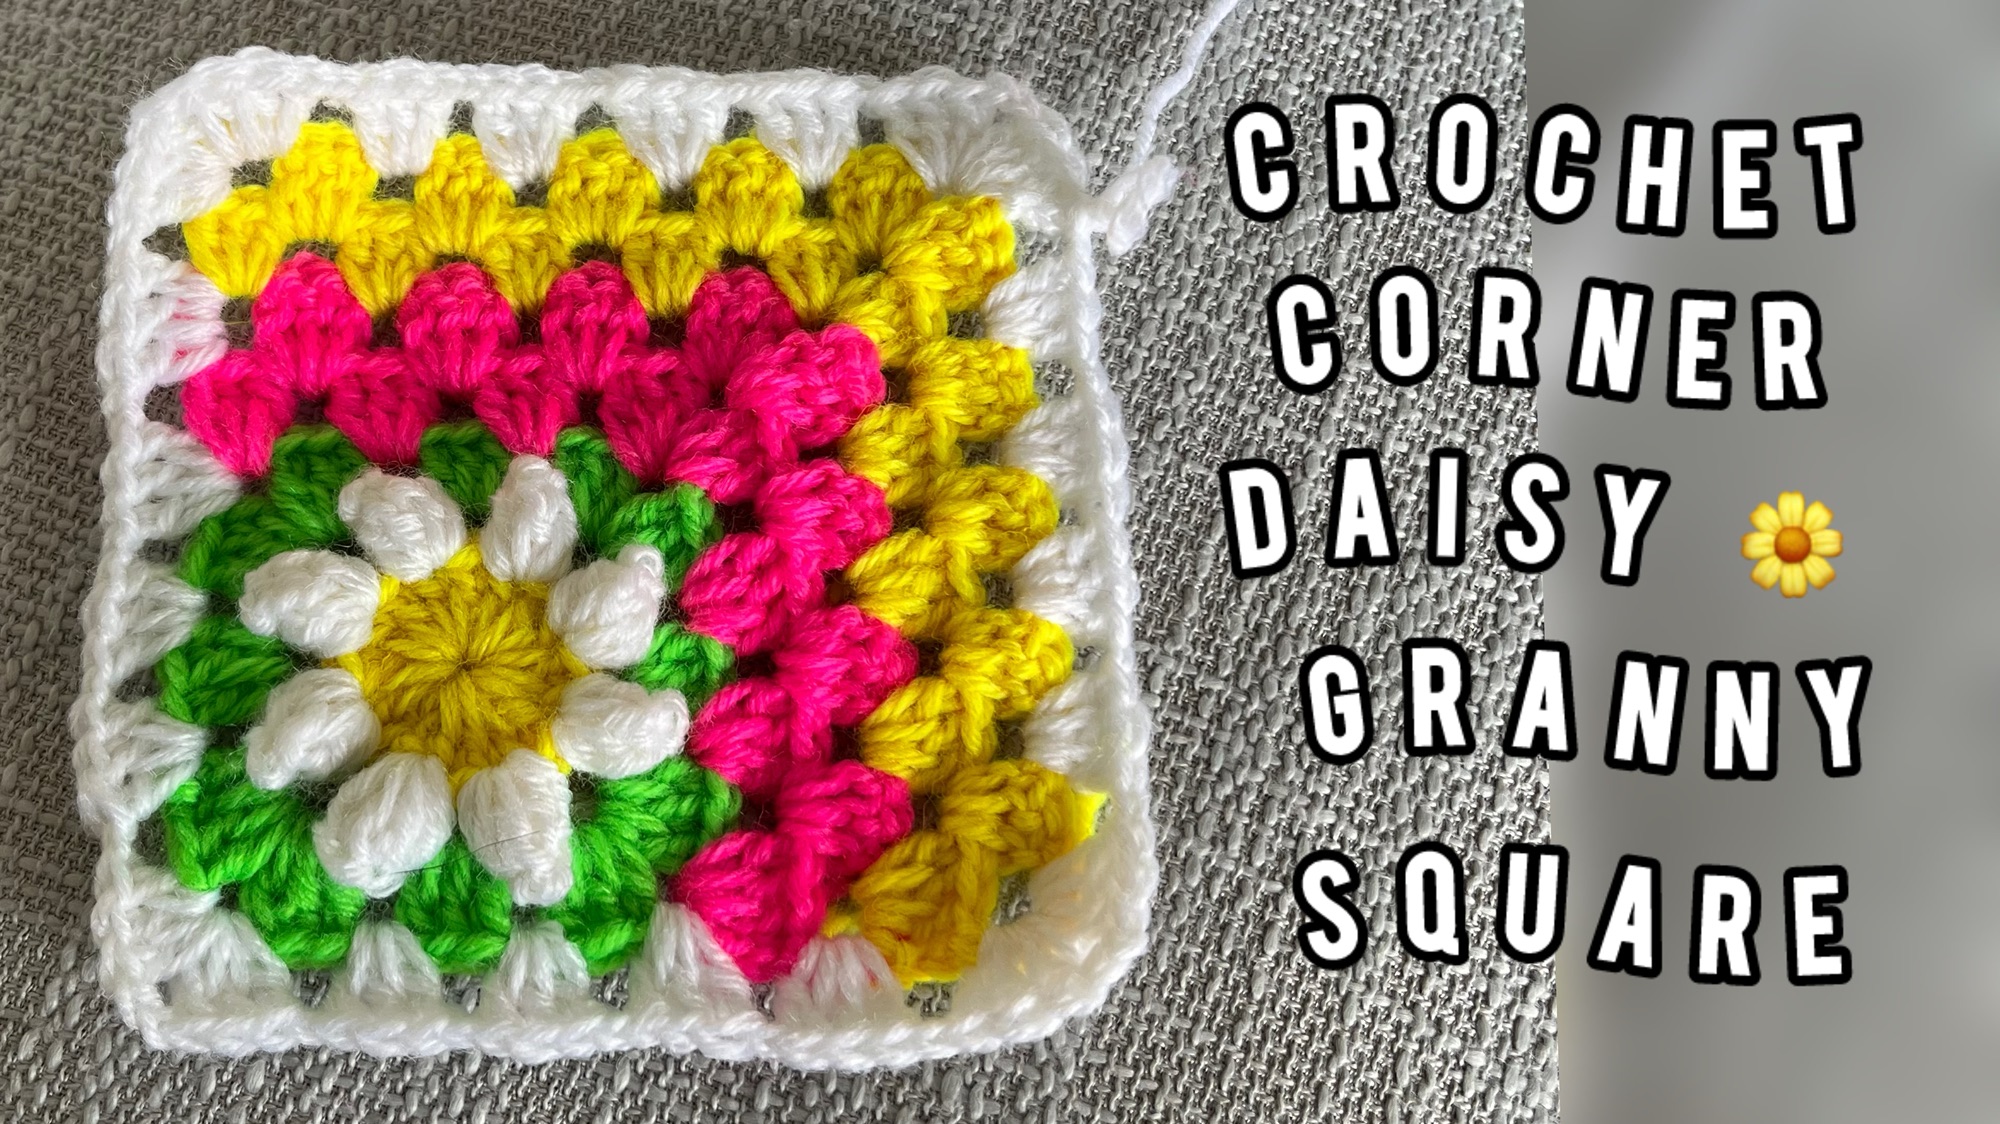
Welcome to your next favorite crochet project! If you’re familiar with granny squares but want to add a unique twist, a Corner Daisy Granny Square might be just the thing. This beautiful square combines a simple granny square pattern with a daisy at one corner, creating a delightful and textured look. It’s perfect for spring-themed blankets, scarves, or even pillow covers!
So let’s get started with a step-by-step guide on how to crochet a Corner Daisy Granny Square easily, even for beginners.
SHARING IS CARING 🙂
PIN IT TO YOUR FAVORITE BOARD ON PINTEREST
♥️♥️♥️♥️♥️♥️♥️♥️♥️♥️♥️♥️♥️♥️♥️
Isn’t this beautiful? This Corner Daisy Granny Square pattern is perfect for adding a pop of color and charm to your home! You can incorporate these cheerful squares into larger projects like blankets, cushions, or bags. I’m personally using mine as vibrant coasters—they’re absolutely delightful and brighten up any table setting!
You’ll find the written instructions for this lovely and simple Corner Daisy Granny Square in this blog. However, if you’d like to see the stitching technique in action, check out the tutorial on my YouTube channel for a visual guide.
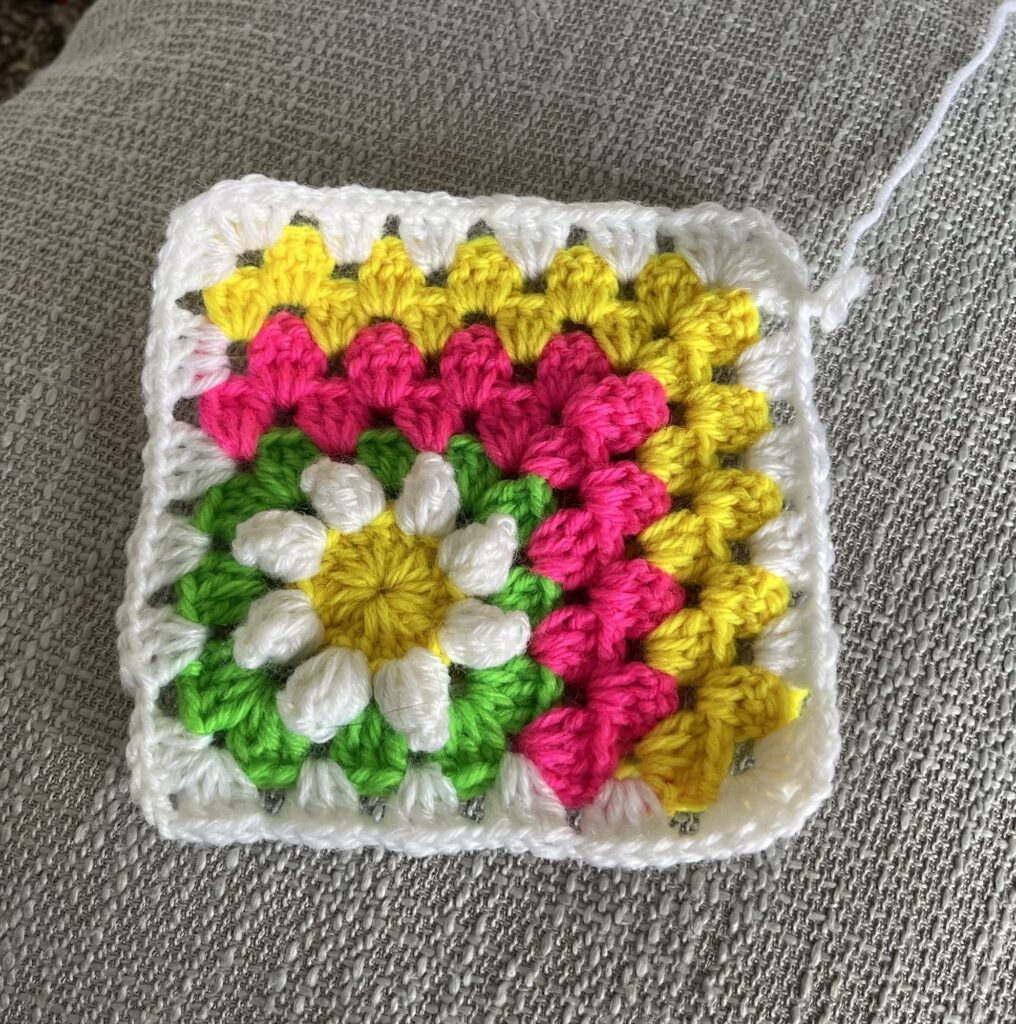
This project is simple and beginner-friendly, making it perfect for anyone new to crochet! With its basic stitch patterns, it’s easy to follow and doesn’t require intense focus, allowing you to relax and enjoy the process. It’s a wonderful way to experience the joy of crocheting without needing complex techniques, resulting in a fun and satisfying project in no time!
For a step-by-step video tutorial, check out my YouTube channel, where I guide you through each stage of the Corner Daisy Granny Square.
Please subscribe to my channel for all the latest and the best patterns.
Since, Most of the crochet lovers just loved this pattern….. I think, you will also love it……
Therefore, just leave a comment in the comment section about it.
For getting updates of all my free patterns, please fill in the subscribe form
DECLARATION
Hi, I am Shabari Dutta. I work very hard on each and every pattern provided in this website, So you can always give a credit by mentioning my name & website www.hookedinloopsbyshabari.com in your posts.....♥️♥️♥️♥️♥️♥️♥️♥️♥️♥️♥️♥️♥️♥️♥️, h
You can sell any product made from this patternowever, you may not distribute this pattern as your own in any way!
Materials Needed
- Yarn: Three to four colors of your choice. I have used 4 ply acrylic yarn.
- Crochet hook: Size recommended for the yarn (usually 2.5mm-3.5mm)
- Scissors
- Yarn needle: For weaving in the ends
Abbreviations
- Ch: Chain
- Sl St: Slip Stitch
- Sp/s: Space/s
- DC: Double Crochet
- PC: Popcorn Stitch
How to do Popcorn Stitch-
Step-By-Step Instructions For the Crochet Daisy Corner Granny
Step 1: Making the Crochet Daisy Center
- Begin with a Magic Ring.
- Then Ch 2 (does not count as a stitch).
- Work 16 DC inside the ring.
- Finally, close the ring by pulling on the tail yarn to tighten the center.
- Then join with a Sl St into the top of the first DC.
Step 2: Creating the Crochet Popcorn Petals
- Change yarn color to your petal color (e.g., white).
- Ch 2 (does not count as a stitch).
- For each petal:
- Work a Popcorn Stitch (PC) in the same stitch for the first petal.
- To make a PC: Work 5 DC in the same stitch. Remove the hook from the loop, insert it into the top of the first DC, then grab the dropped loop, and pull it through the stitch.
- Then Ch 3 after each PC to separate the petals.
- Repeat the popcorn petal in every other stitch around. You should have 8 popcorn petals by the end.
- Join with a Sl St to the top of the first petal.Tip: Popcorn stitches may feel snug; keep an even tension and ensure you add a Ch 3 space between each petal to prevent crowding.
Step 3: Adding the Crochet Square Background– Round 1 of the background
- Change to your background color (e.g., green).
- Ch 2 (does not count as a stitch) in any ch3 sp of last round.
- Then in the same Ch-3 space of the last round, work:
- (3 DC, Ch 2, 3 DC, Ch 1) to form the first corner.
- In the following Ch-3 space, work:
- 3 DC, Ch 1 to form the first side.
- Then in the next Ch-3 space, work:
- (3 DC, Ch 2, 3 DC, Ch 1) to form the next corner.
- Continue this pattern all around the square, alternating corner stitches (3 DC, Ch 2, 3 DC, Ch 1) and side stitches (3 DC, Ch 1).
- Finally join with a Sl St at the top of the first DC.
Step 4: Expanding the Crochet Square (Adding Four More Rounds)
With the daisy square complete up to the first round of the background, we’ll continue by adding four additional rounds to create a larger square.
Round 2 (background color):
- Ch 2 (does not count as a stitch) in any ch2 sp of last round. This is going to be the 1st corner st- (3 Dc, Ch1).
- Then in each next two Ch-1 space along the sides, work (3 DC, Ch1).
- In following corner Ch-2 space, work (3 DC, Ch 2, 3 DC, Ch1).
- Then in each next two Ch-1 space along the second side, work (3 DC, Ch1).
- In the following ch2 sp, do 3dc.
Round 3 (background color):
- Start with Ch3 (counts as a dc) + Ch1.
- Then in each next three Ch-1 space along the sides, work (3 DC, Ch1).
- In following corner Ch-2 space, work (3 DC, Ch 2, 3 DC, Ch1).
- Then in each next three Ch-1 space along the second side, work (3 DC, Ch1).
- In the last dc of the 3dc set, do 1dc. (ch1 and cut the yarn if you want to do a colour change like me or continue with same colour)
Round 4 (background color):
- In the last ch1 sp of the previous round do, Ch 2 (does not count as a stitch) in any ch2 sp of last round. This is going to be the 1st corner st- (3 Dc, Ch1)
- Then in each next three Ch-1 space along the sides, work (3 DC, Ch1).
- In following corner Ch-2 space, work (3 DC, Ch 2, 3 DC, Ch1).
- Then in each next three Ch-1 space along the second side, work (3 DC, Ch1).
- In the following ch2 sp, do 3dc.
Round 5 (background color):
- Start with Ch3 (counts as a dc) + Ch1.
- Then in each next four Ch-1 space along the sides, work (3 DC, Ch1).
- In following corner Ch-2 space, work (3 DC, Ch 2, 3 DC, Ch1).
- Then in each next four Ch-1 space along the second side, work (3 DC, Ch1).
- In the last dc of the 3dc set, do 1dc. (ch1 and cut the yarn if you want to do a colour change like me/ or continue with same colour)
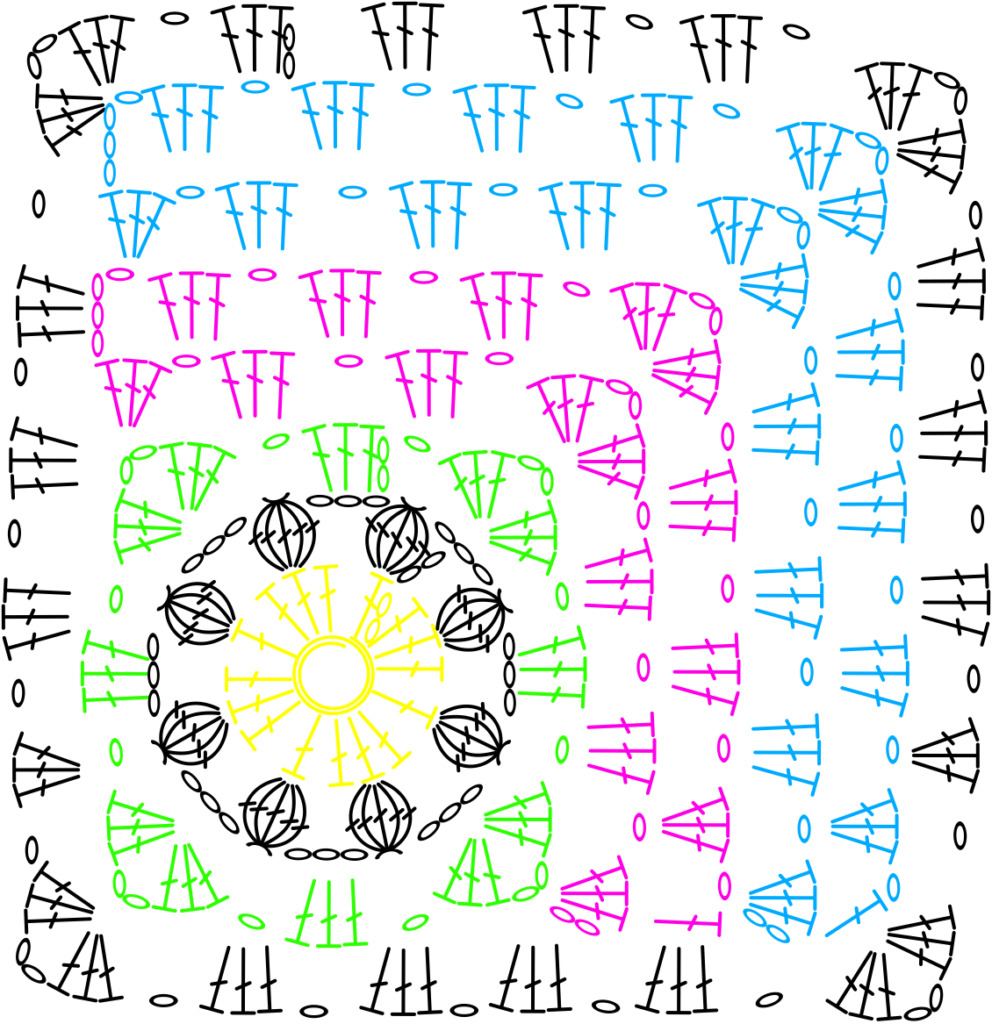
The Crochet Border Round (follow the figure below for better understanding)
- In any ch1 sp (just before the 1st ch4 space of pervious round), do ch2(does not count as st), do (3dc, ch1) in the same sp. In the ch4 sp, do (3dc, ch2, 3dc, ch1).- 1st corner
- In the following ch 4 sp, do 3dc, ch1.
- In the following ch2 sp, do 3dc, ch1.
- Then in the next two ch1 sps, do 3dc, ch1.
- In following ch2 sp, do (3dc, ch2, 3dc, ch1).- second corner.
- In the next two ch1 sps, do 3dc, ch1.
- In the following ch2 sp, do 3dc, ch1.
- In the next (single double crochet stem)- do 3dc, ch1.
- In the following (single double crochet stem)- do (3dc, ch2, 3dc, ch1).- third corner.
- In the next 4 ch1 sps, do 3dc, ch1.
- In the following ch2 sp- do (3dc, ch2, 3dc, ch1).- fourth corner.
- In the next 3 ch1 sps- do 3dc, ch1.
- Sl St in the 1st dc, ch1, cut the yarn.
Tips for Success for the Crochet Project
- Choosing Colors: Daisies are often white with yellow centers, but feel free to get creative! You can use pink, purple, or even multicolored yarn for the petals.
- Joining Squares: To create a larger piece, join your granny squares with a slip stitch or single crochet as you go.
Ideas for Using Corner Daisy Granny Squares
- Blankets: Make multiple squares and join them for a beautiful, floral-themed throw.
- Pillow Covers: Crochet four to nine squares, depending on the size, and seam them together for a lovely pillow cover.
- Tote Bag: Arrange squares to form the front and back panels of a bag, add straps, and enjoy a handmade accessory.
Conclusion
The Corner Daisy Granny Square is a fun and rewarding project, perfect for adding a floral touch to your crochet repertoire. With simple steps and endless color options, you can make a cozy, cheerful blanket or other decorative pieces. Happy crocheting.


Let us know in the comments if you tried this pattern or have other tips to share! Happy crocheting! 🌼
| Subscribe … on Youtube | Follow … on Pinterest | Follow … on Instagram | |
