Table Of Contents
Introduction to This Lovely Crochet blog
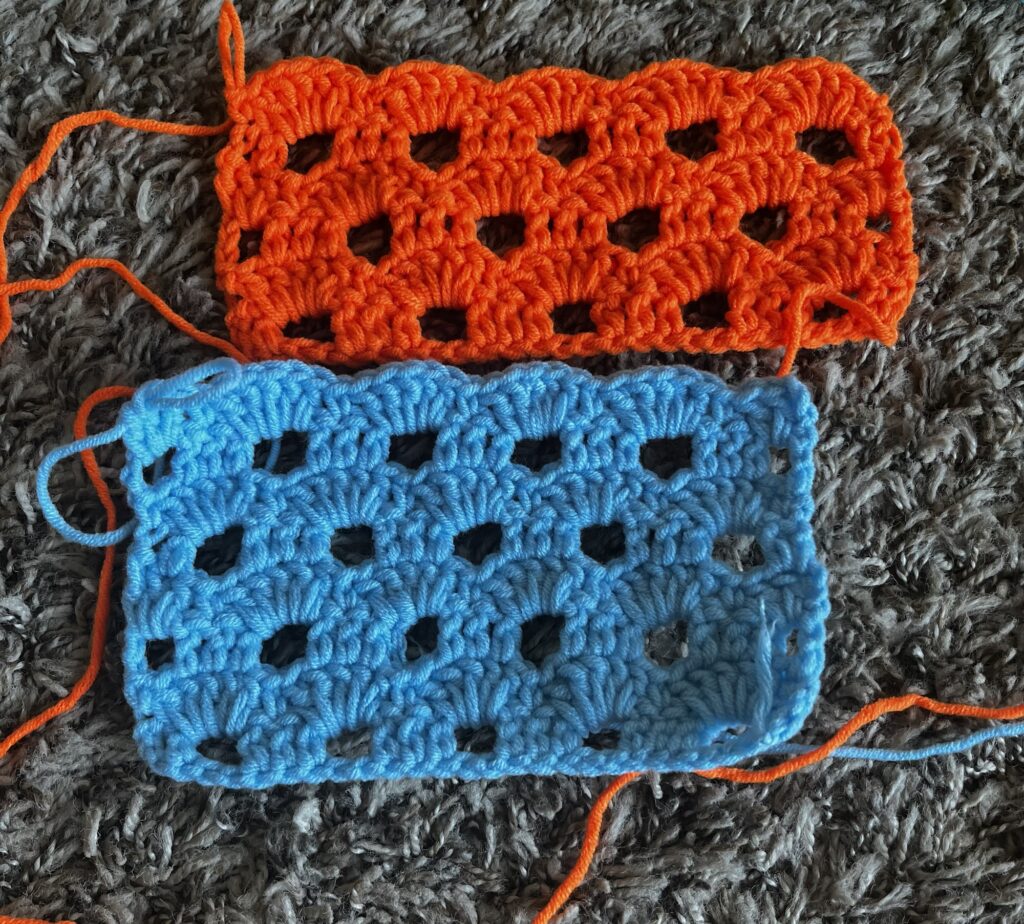
If you’re looking to add elegance and texture to your crochet projects, the Arch Stitch is a fantastic choice! This pattern combines graceful arches and clusters of double crochets, giving your work a delicate, lacy effect. Whether you’re crafting a blanket, shawl, or scarf, this stitch will elevate your project with an intricate yet simple-to-follow design.
In this blog, I’ll guide you through how to crochet the Arch Stitch. I will be breaking it down row by row and providing some helpful tips for success.
SHARING IS CARING 🙂
PIN IT TO YOUR FAVORITE BOARD ON PINTEREST
What is the Arch Stitch?
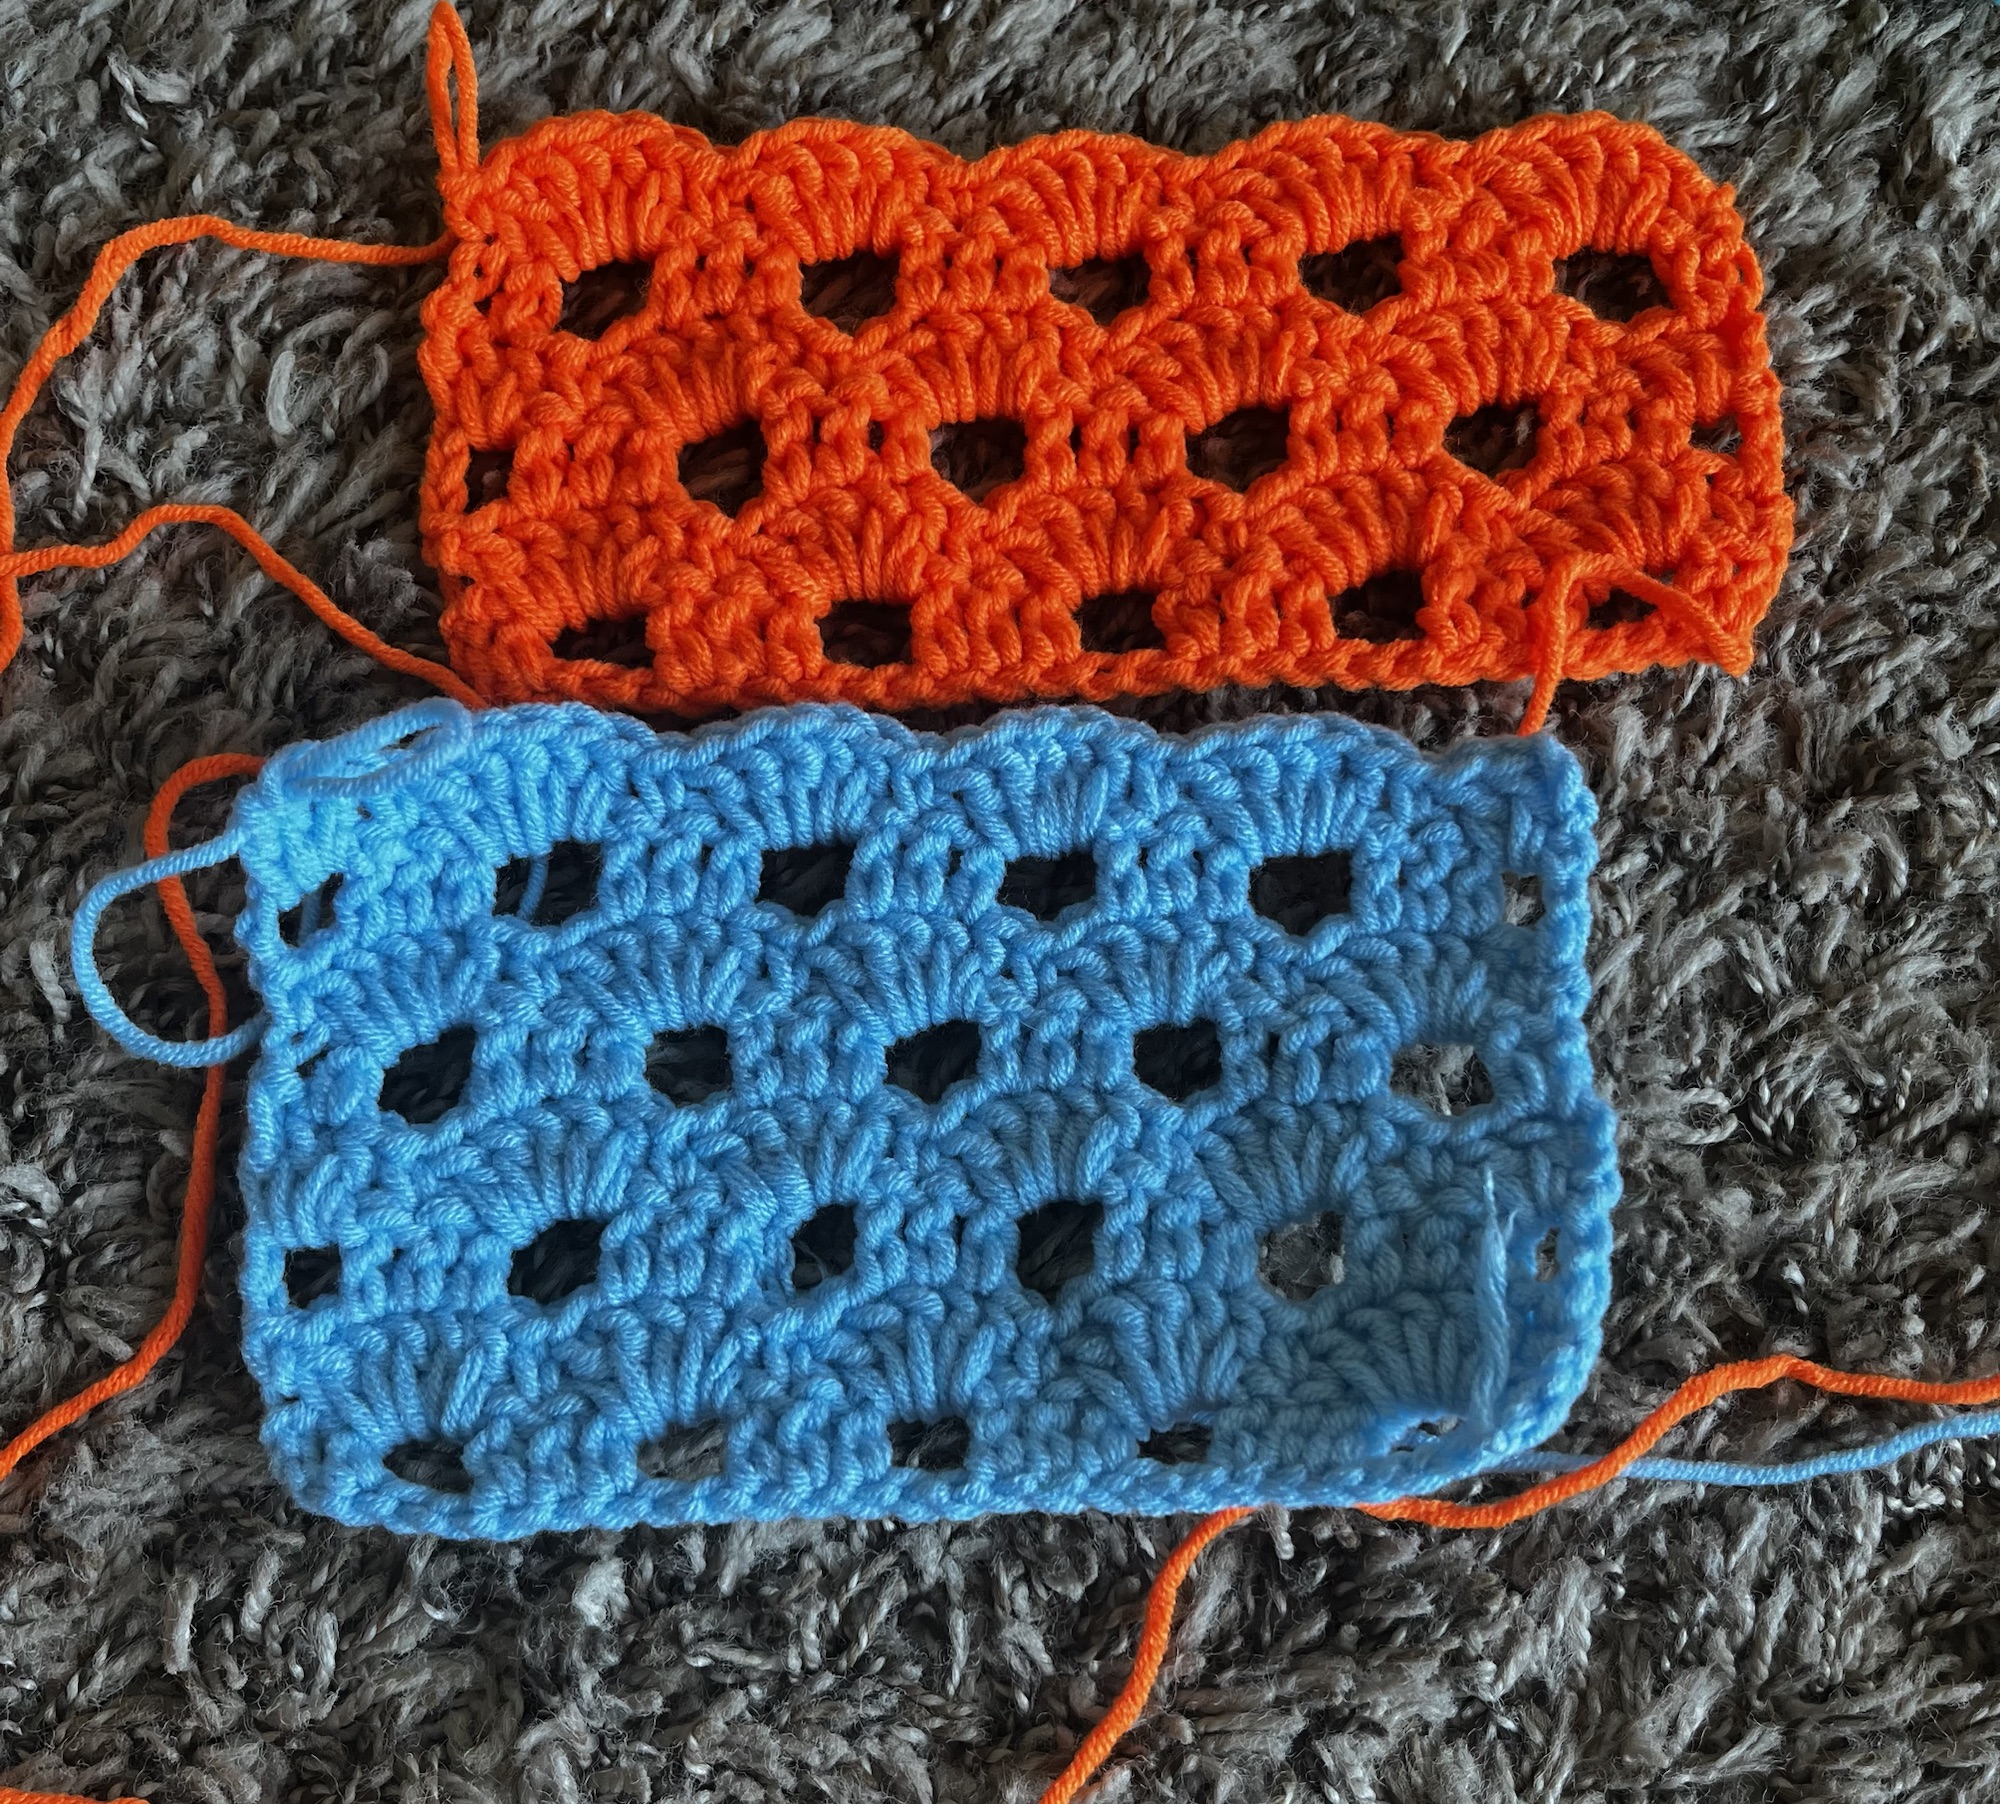
The Arch Stitch is a crochet pattern that creates a beautiful, lacy texture made of arches and clusters of stitches. While it looks intricate, it’s quite straightforward once you grasp the rhythm of the pattern. The Arch Stitch is worked in a repeating sequence of four rows, alternating between foundation rows and arch-building rows to create a delicate, elegant design.
If you’re looking for a detailed, step-by-step guide, follow along with our instructions and the youtube live class tutorial to master this stitch and incorporate it into your crochet projects!
Please subscribe to my channel for all the latest and the best patterns.
Since, Most of the crochet lovers just loved this pattern….. I think, you will also love it……
Therefore, just leave a comment in the comment section about it.
For getting updates of all my free patterns, please fill in the subscribe form
DECLARATION
Hi, I am Shabari Dutta. I work very hard on each and every pattern provided in this website, So you can always give a credit by mentioning my name & website www.hookedinloopsbyshabari.com in your posts.....♥️♥️♥️♥️♥️♥️♥️♥️♥️♥️♥️♥️♥️♥️♥️, h
You can sell any product made from this patternowever, you may not distribute this pattern as your own in any way!
What You’ll Need:
Before we jump into the pattern, make sure you have the following materials:
- Your favorite yarn (you can choose any weight, but for a more defined look. I recommend using DK or worsted weight).
- The corresponding hook size for your yarn (check the yarn label for recommendations).
- Scissors and a yarn needle for weaving in ends.
Understanding the Basics of the Crochet Pattern
Before starting, let’s break down some of the key stitches you’ll need to know:

How to Crochet the Arch Stitch Pattern
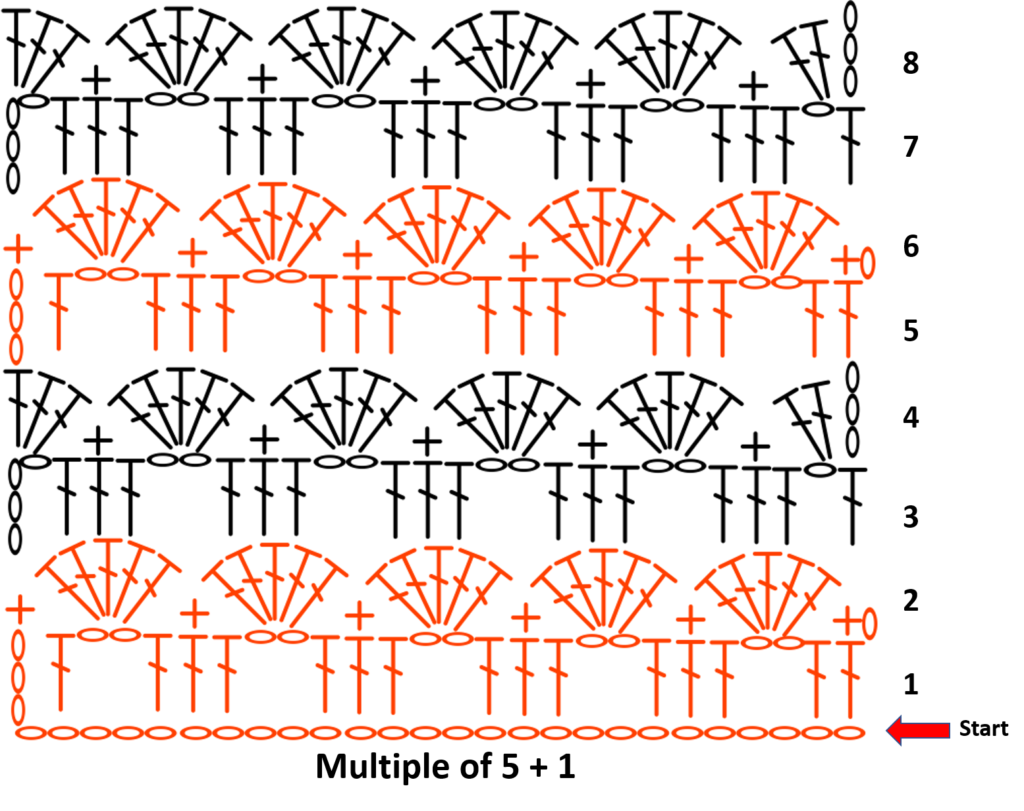
This pattern is based on a 4-row repeat. Here’s how to get started:
Foundation Chain:
Start by chaining multiples of 5 + 1. For instance, in this example, we will begin with 26 chains (25 + 1).
Row 1:
To begin, chain 3 (which counts as the first double crochet), then make 1 double crochet in the 5th chain from the hook. After that, chain 2 and skip the next 2 chains. Following this, work 1 double crochet in each of the next 3 chains. Consequently, repeat this sequence—chain 2, skip 2 chains, and make 1 double crochet in each of the next 3 chains—four times. As you approach the end of the row, chain 2, skip 2 chains, and work 1 double crochet in each of the last 2 chains.
Row 2:
First, chain 1 and turn your work. Then, make 1 single crochet in the first double crochet. Next, skip the following double crochet and proceed to work 5 double crochets in the chain-2 space. Afterward, make 1 single crochet in the second double crochet of the 3 double crochet set and work 5 double crochets in the next chain-2 space. Repeat this sequence four times. To finish the row, skip the next stitch and make 1 single crochet on top of the turning chain.
Row 3:
Start by chaining 3 (which acts as the first double crochet) and then chain 1 before turning your work. Skip the first double crochet stitch and proceed to make 1 double crochet in each of the next 3 double crochet stitches. Afterward, chain 2, skip the next double crochet, single crochet, and double crochet, then make 1 double crochet in each of the next 3 double crochet stitches. Repeat this pattern four times. Near the end of the row, chain 1, skip the next double crochet stitch, and finish with 1 double crochet in the last single crochet stitch.
Row 4:
To begin, chain 3 (which counts as the first double crochet). In the chain-1 space, work 2 double crochets. Then, make 1 single crochet in the second double crochet of the 3 double crochet set and work 5 double crochets in the next chain-2 space. Repeat this sequence four times. Toward the end, make 1 single crochet in the second double crochet of the final 3 double crochet set, skip the next double crochet, and work 2 double crochets in the chain-1 space. Lastly, make 1 double crochet on top of the turning chain.
Row 5:
Repeat the steps from Row 1. Begin by chaining 3 (acting as the first double crochet) and work 1 double crochet in the next stitch. Then, chain 2, skip the next 2 stitches, and work 1 double crochet in each of the next 3 double crochet stitches. Repeat this four times. Finish the row by chaining 2, skipping the next 2 stitches, and working 1 double crochet in each of the last 2 stitches.
Row 6:
Simply repeat the steps from Row 2.
Row 7:
At this point, repeat the steps from Row 3.
Row 8:
Finally, repeat the steps from Row 4 to complete the sequence.
To extend the pattern and increase the number of rows, simply continue by repeating the sequence of Rows 1 through 4. Each time, you will follow the same steps, maintaining the established rhythm of stitches:
- After completing Row 4, go back and repeat Row 1.
- Then, follow with Row 2, Row 3, and Row 4 again.
Continue cycling through these rows until you reach your desired length. This method ensures the pattern will expand evenly and consistently.
4 Important Tips for Success with the Crochet Arch Stitch
First and foremost, maintain consistent tension to ensure your arches and rows stay even and uniform throughout the project.
Additionally, always count your stitches regularly to avoid mistakes, especially when skipping or working into chains.
Moreover, use stitch markers to keep track of the beginning or end of rows, particularly when working on larger pieces.
Finally, block your finished project to open up the stitches and enhance the arch pattern for a polished, professional look.
Projects You Can Create with the Arch Stitch
- Scarves and Shawls: The lacy, delicate texture of the Arch Stitch makes it perfect for lightweight scarves and shawls. For instance, it adds an elegant, airy feel to these accessories.
- Blankets: The repeating pattern is easily adaptable for larger projects like blankets. In fact, its flowing arches create a beautiful and cozy fabric for a throw or baby blanket.
- Table Runners: Additionally, the Arch Stitch is ideal for decorative pieces like table runners, giving a classic, vintage look to your home decor.
- Wraps and Ponchos: Finally, use the Arch Stitch to create stylish wraps or ponchos. Its open design allows for breathability, making it great for layering.
These versatile projects showcase the Arch Stitch’s beauty and adaptability, perfect for any crochet project!
Conclusion
The crochet arch stitch is a versatile and visually appealing technique that can elevate any project, from cozy blankets to intricate garments. By mastering this stitch, you open the door to a world of creative possibilities, allowing you to experiment with colors and patterns that bring your unique vision to life. Whether you’re a beginner or an experienced crocheter, incorporating the arch stitch into your work can enhance your skills and add an elegant touch to your creations. So grab your yarn and hook, and let your imagination soar as you explore the beauty of the crochet arch stitch!

Happy crocheting!
| Subscribe … on Youtube | Follow … on Pinterest | Follow … on Instagram | |
